Friday, January 29, 2021

A Little Love


Today is the day I am posting my card for our Challenge Your Stash group on SCS.  This is our 78th month of de-stash and we are starting our 5th year of our challenges.  

The premise is to create a card or something else that uses only items that are in your own stamp room--nothing new is to be purchased.  The hostess each month posts their challenge to the group. Each person in the group creates their card with their own image, their own papers, their own embellishments with their own supplies--using up items from their own stash!  The card can be for any occasion and each person is encouraged to send the card on its way to someone so it can be admired.  It is a way for us to step out of the box a bit and create something that follows a challenge--isn't that what a challenge is supposed to be.  And--no money is spent as all items are to be already available in each of own stamping spaces.

Lisa posted our January challenge--Create a friendship card and use a flower or heart on your card.

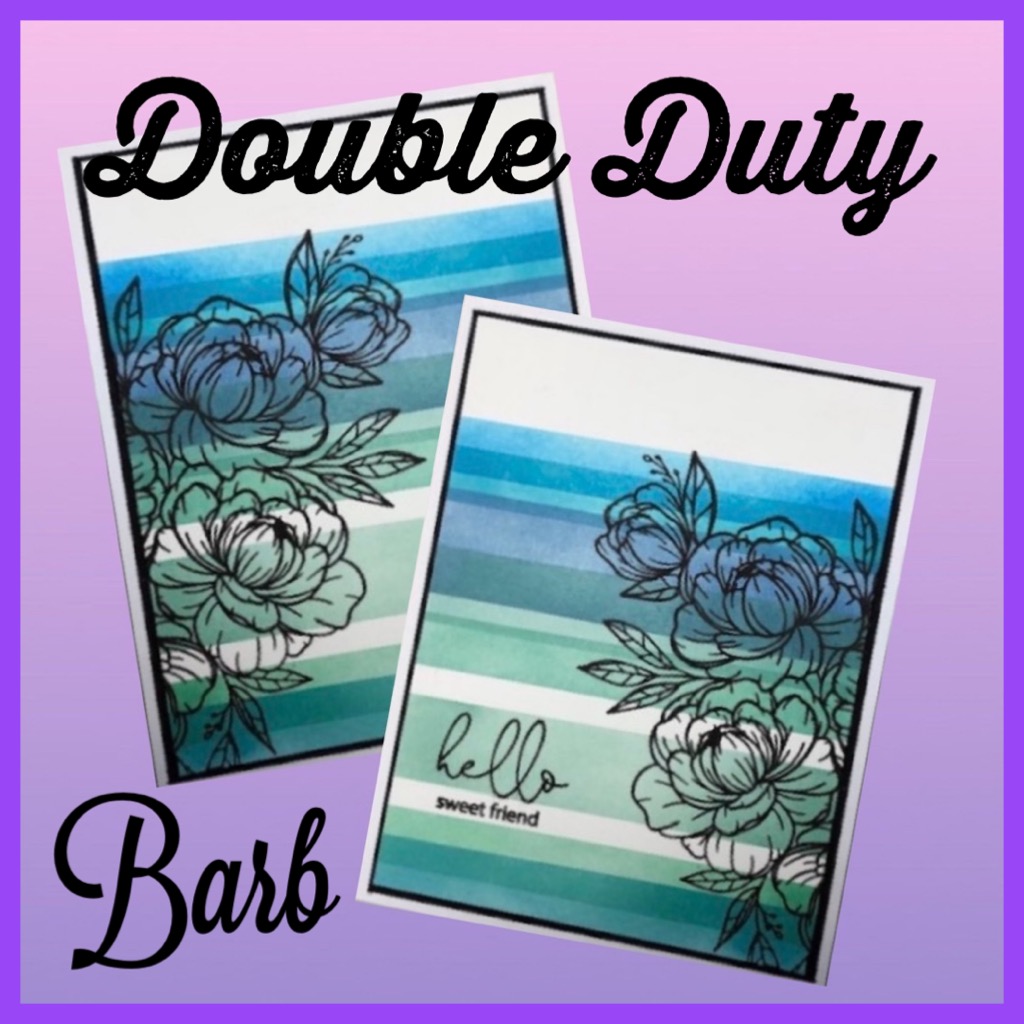
I picked a new Gina K Designs stamp, die and stencil combo called A Little Love Bundle. I first inked the three step stencils with my Taylored Expressions Blender Brushes and TE ink cubes.  It is fun to take off each subsequent stencil to see the sweet patterns.  I then die cut some of the images with the coordinating dies.  I then die cut the word Love and the shadow from white and Magenta Madness.  The small sentiment is from the same set and I stamped in black ink and used a banner die from a Gina K Master Layouts.  The background is a We R Memory Keepers Geometric Embossing Folder.   I added all of the die cuts on the background and added Gina K Angel Aura Rhinestones for the final touch!


Here is the inside of my card:


If you check some of the blogs on my sidebar, you may find others who have posted their cards in the next few days. There may be more posted in the thread on SCS, so you might want to check out the link here.  We also have a keyword for the SCS Gallery--it is CYSJAN.  You might see many cards there if you do a search.  They probably will be posted today or maybe yesterday or in the next few days.

I hope you enjoyed my card and I know I am excited to check out what my other hoarders, I mean stash reducers have made!  Thanks for stopping by today!  For February, Danielle is up for our challenge.  Be sure to check back to see what we create then!

Image/Sentiment:  Gina K Designs A Little Love Stamp, Die and Stencil Bundle

Cardstock:  The Paper Cut Cougar Opaque 110# White; Stampin' Up Pear Pizzazz, Magenta Madness, Basic Black

Ink:  
Taylored Expressions Ink Cubes

Accessories:  Gina K Angel Aura Rhinestones, Master Layouts; We R Memory Keepers Geometric Embossing Folder


Thursday, January 28, 2021

Stamping Sisters Mini Winter Camp ~ Day 4


Hello friends and Stamping Sisters!  Welcome to Day 4--the final day-- of our Stamping Sisters Mini Winter Camp 2021. I was the first teacher on Monday and we learned how to strip.  Using card strips--not what you might be thinking.  It is winter by the way!   Darlene was our teacher Tuesday and we learned to reflect.   Wednesday it was Kelly's day to teach us to use some of the magazines we have for backgrounds.  Today, our teacher is Jeanette-let's see what she is presenting. Please join us--it sure will be fun!


Here are our blogs and the days we were the camp counselor if you need to look back:

Monday, January 25 ~  Barb (me!)  @ inkingintoretirement
Tuesday, January 26 ~ Darlene @ Accordingtobijou
Wednesday, January 27 ~ Kelly @ Sandcastlestamper
Thursday January 28 ~ Jeanette @ Creativeplay


For Jeanette's card, this is what she said:  Grab that bottle old-fashioned school glue. It could be the good stuff (Elmer's) or the cheap stuff. I read somewhere - I don't remember where - that when you add glue to cardstock (AND LET IT COMPLETELY DRY), you will get varying coverage of ink when you blend ink onto it. As I recall the technique could be used with any kind of ink. So--take a piece of plastic packaging and added a fair amount of glue in a pool on it and then I dabbed a 2" square acrylic block into the glue and then transferred the glue onto a piece of cardstock by gently placing the acrylic block on the cardstock, glue-side down. I repeated this process until I had a reasonable coverage on the cardstockSet the glued pieces of cardstock aside and let them completely dry. Once the glue has completely dried, use a blender brush to add ink to the cardstock and notice how the glue areas take the ink differently than those without glue. She also had a few other options so be sure to check out her blog if you want more info.  

I have never done something like this, so it was time to get into a sticky situation.  I took cheap glue--office supply store type--and put it on a piece of thick acetate.  I had a small piece about 2" x 4" that I cut off of the piece I used for Darlene's reflection technique on Tuesday.  I then swiped it over three different types of cardstock--two different whites-Neenah and Cougar as well as an ivory from Recollections.  I put down the glue in the morning, before I did a few errands and a treadmill walk.

This afternoon, they were all dry, though I could not see much difference in how the sheets looked.  I then brush blended two shades of colors of Taylored Expressions inks on each of the cards and then I saw the shades react differently.


I decided to use the purple one and the shades of brown on the ivory.  For the purple, I picked a die from The Stamps of Life called Thank You.  I also cut a larger circle from a piece of cardstock to see how that looked under, but I liked the color showing through.  A few enamel dots was the only embellishment.


For the shades of brown, I used two Stampin' Up sets--Gently Falling for the leaf and Country Home for the sentiment.  I used Gina K Designs Master Layouts 2 and 3 to cut the circles and stitching around the colored panel.  Three enamel dots and linen thread are the added embellishments.


I really like both of the cards and the panels with the colors are pretty:


I hope you have enjoyed my cards. I invite you to join us by making your own card today and maybe go back to make a card from the previous three days.  It is now your turn. Please check out Jeanette's blog today to get her tips on how to make a sweet background with glue..  And, be sure to check out Darlene and Kelly's blog later today to see how well they did on this technique.  Go and have some fun!  

I am not sure what the plans are for future camps--but I am ready for round 3!  Maybe later this spring or in the early summer again like we did in 2020.  I hope you have enjoyed our week of winter camping!


Image/Sentiment:  Stampin' Up Gently Falling, Country Home/The Stamps of Life Thank You Die

Cardstock:  Stampin' Up Early Espresso, Soft Suede; Gorgeous Grape, Highland Heather; Neenah Classic Crest White; Cougar Opaque White; Recollections Ivory

Ink:  Stampin' Up Early Espresso, Crumb Cake on Leaf Card/Various Taylored Expressions Ink Cubes for backgrounds, using TE Blender Brushes

Accessories:  White Glue; Enamel Dots; Stampin' Up Linen Thread; Gina K Designs Master Layouts 2 and 3


Wednesday, January 27, 2021

Stamping Sisters Mini Winter Camp ~ Day 3


Hello friends and Stamping Sisters!  Welcome to Day 3 of our Stamping Sisters Mini Winter Camp 2021. I was the first teacher on Monday and we learned how to strip.  Using card strips--not what you might be thinking.  It is winter by the way!   Darlene was our teacher yesterday and we learned to reflect.   Today it is Kelly's day to teach us--so let's go. Please join us--it sure will be fun!


Here are our blogs and the days we are going to be the camp counselor:

Monday, January 25 ~  Barb (me!)  @ inkingintoretirement
Tuesday, January 26 ~ Darlene @ Accordingtobijou
Wednesday, January 27 ~ Kelly @ Sandcastlestamper
Thursday January 28 ~ Jeanette @ Creativeplay


For Kelly's card, this is what she said:  We are going to be doing Stamped Paper!  Supplies need: Any magazine, ink and a stamp w/ a matching die if desired (you can always just fussy cut!)  Pick your magazine page and ink up a stamp. Stamp directly onto your magazine paper and let it dry. The paper tends to be a little slick - so a heat gun may be good, too but not necessary. Once it's dry, die cut/fussy cut your image and add it to your card.

I have never done something like this, so it was a very fun card and technique.  First, I went through a few magazines  and picked some colorful pages.


Then, I picked the stamps and for one set, the matching dies.  I went with 2 Gina K Designs sets--Beautiful Butterflies and Friendship Flower.  There are dies for the butterfly set, so I stamped and cut a few different ones.  I then fussy cut the floral image.


For my card, I embossed a background with a Cuttlebug Folder called Modern Wallpaper.  I placed the flower down first and added two of the butterflies on the leaves, on the edges.  I added three sequins for a bit of bling!


Here is the inside of my card, with an additional butterfly:


I hope you have enjoyed my card. I invite you to join us by making your own card today and maybe go back to make a card with paper strips from my lesson on Monday and one with Darlene's reflections class from yesterday.   And, I do hope you are able to play along with us tomorrow with Jeanette's lesson.  We will each post our lesson in the morning and then in the afternoon, we will post a card made from the day's lesson.  Yes, Jeanette is up tomorrow morning with her class and I will be posting a card from her tutorial tomorrow afternoon. 

It is now your turn. Please check out Kelly's blog today to get her tips on how to stamp on your magazine pages.  And, be sure to check out Darlene and Jeanette's blog later today to see how well they did on this technique.  Go and have some fun!  


Image/Sentiment:  Gina K Designs Beautiful Butterflies Stamp set plus matching dies and Friendship Flower

Cardstock:  Stampin' Up Night of Navy, Daffodil Delight, Seaside Spray; Magazine pages

Ink:  Versafine Onyx Black

Accessories:  Cuttlebug Modern Wallpaper; Sequins


Tuesday, January 26, 2021

Stamping Sisters Mini Winter Camp ~ Day 2


Hello friends and Stamping Sisters!  Welcome to Day 2 of our Stamping Sisters Mini Winter Camp 2021. I was the first teacher yesterday and we learned how to strip.  Using card strips--not what you might be thinking.  It is winter by the way!  Today it is Darlene's day to teach us--so let's go. Please join us--it sure will be fun!


Here are our blogs and the days we are going to be the camp counselor:

Monday, January 25 ~  Barb (me!)  @ inkingintoretirement
Tuesday, January 26 ~ Darlene @ Accordingtobijou
Wednesday, January 27 ~ Kelly @ Sandcastlestamper
Thursday January 28 ~ Jeanette @ Creativeplay


For Darlene's card, this is what she said:  OK...my class, along with my "tutorial" is "Reflection Technique".  Why do I have "tutorial" in quotes??  Because my card is a lesson in what went wrong!  Hahahahaha!  I can't wait to see what you all can do RIGHT!  I do hope that you  play along and have fun in our winter virtual stamp camp! So...My idea was to watercolor a landscape with sky, earth and lake.  Then create silhouettes of trees using SU's timeless classic "Lovely as a Tree" set.

I have tried the reflection technique in the past and have not been successful.  Today was no different as my card is the third attempt!  For my first card, I watercolored a piece of Fabriano Cold Press watercolor cardstock with Altenew Watercolor Brush Markers--the Tropical Fiesta Set.  Then, I stamped the large Lovely as a Tree with Hero Arts Intense Black.  So far--so good.  Then, I stamped the three trees I wanted to reflect in the water on a piece of acetate and laid it on the water.  Nope--nothing happened.  So, I tried it again.  No luck.  So, I tried it with StazOn-still nothing.  I know the color of the water was pretty dark, but I was not seeing hardly any ink--other than one blub on ink!  One final try--let's try Versamark and emboss for a bit of shine, like a true reflection on water or even an icy lake.  So, here is the one that did not turn out at all!


So--that bit of "stuff" on the dark blue water is 4 or 5 attempts with black ink on acetate and the final one with Versamark and embossed with Iridescent Ice.......   See a reflection or just dots?  Epic Fail!

Then, I decided I need to stamp and do the reflection first, and then watercolor.  So, I stamped this time with Versafine Onyx Black and did the reflection with the same ink and a piece of acetate.  I actually did it twice, but it still is not the reflection I had hoped.  I wonder if part of the problem is all of the little lines in the stamps--Oh Well, it is what it is and might not be too back.  This time, I also changed my medium.  I used another Altenew Watercolor product, their pan watercolors.  I also added a sun to the corner and trimmed the cardstock down a bit on all 4 sides.  The sentiment is from a package of Simon Says Stamp sentiment strips.


I hope you have enjoyed my card. I invite you to join us by making your own card today and maybe go back to make one with paper strips from the directions that I posted here yesterday.  And, I do hope you are able to play along with us all week.  We will each post our lesson in the morning and then in the afternoon, we will post a card made from the day's lesson.  Kelly is up tomorrow morning with her class and I will be posting a card from her tutorial tomorrow afternoon. 

It is now your turn. Please check out Darlene's blog today to get her tips on what to do and not do.  And, be sure to check out Kelly and Jeanette's blog later today to see how well they did the reflection technique.  Go and have some fun!  


Image/Sentiment:  Stampin' Up Lovely as a Tree/Simon Says Stamp sentiment strips

Cardstock:  Fabriano Cold Press Watercolor Paper; Stampin' Up Night of Navy, Mossy Meadow, Old Olive

Ink:  Versafine Onyx Black

Accessories:  Altenew Pan Watercolors


Monday, January 25, 2021

Stamping Sisters Mini Winter Camp ~ Day 1


Hello friends and Stamping Sisters!  Welcome to our Stamping Sisters Mini Winter Camp 2021.  Yes, we are going winter camping.  There are four teachers who will be leading your classes this week from 4 different states.  Three are in the middle of winter as Jeanette lives in Illinois, Darlene is in Washington state and I live in Wisconsin.  Our 4th teacher Kelly lives in the sweet state of Florida where I believe winter does not exist!

The 4 of us participated in our first Stamping Sisters Mini Card Camp in June of 2020.  This was the brainchild of my good friend Kelly and when she asked three of us to join her at camp, we all jumped and said yes.  I volunteered at the end of camp last summer to organize another round and that is this week.  Wait--we had a June camp in Florida and now a winter 2021 camp in Wisconsin?  We sure are messed up. But, here we are again! Coincidently, three years ago, all 4 of us were at my house for a "real" stamp Camp-in-Oga weekend!  We still are heading to camp, though for 2020 and now in 2021, this is a virtual one and everyone is invited to attend.  Please join us--it sure will be fun!


Here are our blogs and the days we are going to be the camp counselor:

Monday, January 25 ~  Barb (me!)  @ inkingintoretirement
Tuesday, January 26 ~ Darlene @ Accordingtobijou
Wednesday, January 27 ~ Kelly @ Sandcastlestamper
Thursday January 28 ~ Jeanette @ Creativeplay

Yes, I am up today as your first instructor.  My challenge for the day, along with a tutorial for making a card, is below.  Each day one of us will provide the directions and photos for our card.  The challenge will be posted on the teacher's blog in the morning.  We hope you will join us.  Please Play Along--and remember, it is free to attend our camp!  

For my card, these are the supplies you will need.  Various scraps or pieces of cardstock.  You can use a rainbow of colors—or various shades of one or two colors.  The pieces need to be as long or wide as your card-and will be cut in strips.  You will also need a word die—a large one if possible and a stamp that is a strip sentiment-one line of words or a single word. Then basics, adhesive, card base, die cut machine, ink, etc.

Here we go:

First, I think you should pick out your word die and the sentiment.  I went with  Waffle Flower Oversize Heart and made a second set of cards with Waffle Flower Oversize Hello.


Then, if you have a die set that cuts strips, you can use that.  I recently purchased Simon Says Stamp Strips 1 and 2 as I really like that they have a bit of an edge on the side of the strip.  Or, you can just cut strips in various widths with your paper trimmer.  Your Choice!  I used the dies and cut strips from all 4 of the dies for various widths (.15, .35, .6 and .8)


Now, you will need to decide on your color combo for the background and grab those scraps and strips of cardstock you have saved from past projects.  I went with shades of red:


Taking the various strips, come up with a pattern for placing the strips on your piece of cardstock.  You should start with a piece of A2 cardstock as it can be trimmed at the end for size you want to use for your card front.  You can also use a piece of cardstock that had been stamped on one side as it is going to be covered with strips or can be on the back, like you will see with mine below.  You can either use liquid glue or your tape runner and cover the front of your cardstock with the adhesive.  If using liquid glue, put in on half if the card front at a time so it does not dry out. For my first card, I placed one of the widest strips down the middle from corner to corner.  Then, add different colors and widths of strips as you wish to fill up the card front.  Any random pattern works!


When all of the strips are down, if you turn your cardstock over, it should look something like this:


Now, you can use a large scissors to trim them off along the 4 edges.  


Your completed front is now done and you can trim with a paper trimmer to the card front size you want to use.


I then die cut the word Heart three times from white cardstock and layered them on top of each other, using liquid glue.  I like the dimension the three layers give to word dies--especially the large ones.


I layered my striped background on a piece of black cardstock, then on a white card base.  I think a single sentiment strip looks best with the large die cut, so I picked one and heat embossed on black cardstock.  I added a few white sequins for the final touch.  My card is complete!  Your lesson for today is done.


I then grabbed a few shades of green cardstock and made another set of backgrounds. This time I laid them horizontally, vertically and again on an angle.


I picked another Waffle Flower Stamp and Die Set called Oversize Hello:


Here are the completed three cards I made, with some added bling:


It is now your turn.  Pick a color theme--use one or two colors--or maybe use all of the colors of the rainbow--ROYGBIV!  Cut the cardstock in various widths or use a strip die.  Find a large word die and a coordinating strip sentiment.  Create your striped background with strips, add your word die with the coordinating sentiment and your card is done.  So Now, go and have some fun!  

I hope you have enjoyed my cards and the tutorial for making this fun card.  It is not hard, but I think it looks so cool!  I invite you to join me by making your own card,  And, I do hope you are able to play along with us all week.  We will each post our lesson in the morning and then in the afternoon, we will post a card made from the day's lesson.  Darlene is up tomorrow morning with her class and I will be posting a card from her tutorial tomorrow afternoon.  I have no idea what the other three teachers will be making-I just know the supplies needed!  So, I will be playing along with all of you!


Image/Sentiment:  Waffle Flower Oversize Hello and Heart Stamp Sets and Matching Dies

Cardstock:  Neenah Class Crest 110# Solar White; Stampin' Up Black and shades of red and green 

Ink:  Hero Arts Intense Black; White Embossing Powder

Accessories:  White Enamel Dots; White Sequins; Simon Says Stamp Strips 1 and 2 Die Sets; Stampin' Up Mini Banner Tag Punch; 


Sunday, January 24, 2021

Happy Anniversary


This is a fun and colorful card I made with many Taylored Expressions products.  I used the 3 layering stencils in the Bokeh set, with TE Confetti Cake, Blue Raspberry and Lollipop inks along with my blending brushes.  I picked a fun image from the Gus & Gertie stamp set, but I cut off Gertie the bird...........  The image was colored with my Copic Sketch Markers.    I added the Anniversary sentiment from the Friendly Phrases stamp set--also Taylored Expressions.


Here is the inside of my card, with a fun strip of Washi tape:


I think this is a fun card and I hope you do too!


Image/Sentiment:  Taylored Expressions Gus & Gertie/Friendly Phrases

Cardstock:  Neenah Class Crest 110# Solar White; Stampin' Up Melon Mambo, Bermuda Bay

Ink:  Hero Arts Intense Black; Taylored Expressions Confetti Cake, Blue Raspberry, Lollipop; 

Accessories:  Taylored Expressions Bokeh Stencil; Copic Sketch Markers


Saturday, January 23, 2021

Say It Big!


This is my January card is for the monthly swap that Pam hosts on SCS.  Each month we make 8 cards and include a matching envelope.  They can be any theme for any month.  All of the swappers are wonderful and I have received awesome cards each and every month.  

I inked up one of my un-inked-until-today stamp sets from Unity Stamp Company called Say It Big! I inked up the Congrats with Island Indigo and die cut the sentiment and background with Sizzix Dotted Ovals.  I added a couple of mini banner flags on the side.  The background paper is from Stampin' Up called Noble Peacock Specialty Designer Series Paper--I love the shine and sparkle!  I think everyone can use a Congrats card.


Here is the inside of my card:


I hope Pam and the others swappers like my card this month!


Image/Sentiment:  Unity Stamp Company Say It Big

Cardstock:  Neenah Class Crest 110# Solar White; Stampin' Up Pretty Peacock, Island Indigo, Noble Peacock Specialty Designer Series Paper

Ink:  Stampin' Up Island Indigo

Accessories:  Sizzix Dotted Oval dies; Stampin' Up Mini Banner Punch


Friday, January 22, 2021

Double Duty Debut


Here we go—another challenge for the trio of stampers—Barb, Jeanette and Kelly!  This is our 7th challenge that the three of us are doing together! This was a thought that I had in the middle of the night, similar to what Kelly has had in the past.  Plus, it is a bit of offshoot of our Stamp What Challenge! This one is called Double Duty!


Each month, we get to pick a stamp set from a predetermined company. Then, we will use that one stamp set and make two cards from the set.  Different images and sentiments from the same set can be used, or use the same image two different ways—Double Duty either way!  But, as an added challenge, one item must be used on both cards—same color cardstock, same ribbon, same stencil, same something.  Double Duty Again!  We will post both cards on our blog on the the 22nd of each month.  See-Double Duty again!  We will be sure to have fun getting doubly inky each month with a different stamp company.  Let’s have fun!

For January, the company that I picked was Simon Says Stamp. They really have some great images and many coordinating dies.  And, they carry many additional companies on their site--one stop shopping!  I picked a sweet set that I got last year while the pandemic was going strong, called Paper Hug.  I love the cute images and perfect sentiments in this set. 


The first card was a double gate-fold card, with the image on one panel and the sentiment on the other.  I picked the image of two hands, holding an envelope and colored it with my Copic Sketch Markers.  The patterned paper on the panels is Stampin' Up Follow Your Art--an ideal pick for the theme!  The words Paper Hug is perfect to send to a friend far away.  Three pink sequins are the final touch.  


Here is the inside of that card:


For my second card, I picked the large Hug image with two hands.  Again, I colored the word and hands with my Copic Sketch Markers and die cut the image with Whimsy Stamps Stitched Rectangles Dies. I layered the image over a piece of Real Red cardstock I embossed with Sizzix Hearts Embossing Folder.  I picked a sentiment that really expresses how I feel right now--I so want to hug my friends and family!    I added a pink gem heart on the edge of the sentiment.  

And--I almost forgot--the final Double Duty element.  My color theme for both of these cards were red and pink-or Calypso Coral.  I also colored both sets of the arms different shades, to highlight diversity in my cards and my life!


Here is the inside of my second card:


I hope you enjoyed my first card for our new group.  Please be sure to check out the other Double cards.  Here is a link to Jeanette's and Kelly's blog.  I am sure you will not be disappointed and will see a couple of sets of great cards! I hope Kelly and Jeanette like my card. Lawn Fawn is the company we will use in February, so be sure to check back to see how we double up and make two cards on the 22nd!

Image/Sentiment:  Simon Says Paper Hugs

Cardstock/Patterned Paper:  The Paper Cut Cougar Opaque 110# White; Stampin' Up Real Red, Blushing Bride, Calypso Coral, Follow Your Art Designer Series Paper

Ink:  Hero Arts Intense Black

Accessories:  Stampin' Up Mini Banner Flag Punch; Whimsy Stitched Rectangle Dies; Copic Sketch Markers; Sizzix Hearts Embossing Folder; Pink Sequins; Pink Heart Gem