Monday, July 31, 2023

Glossy Resist


Today is the last day of July and I am posting a set of cards for our newer challenge--Catch-up Club!  A few of my SCS and stamping friends, Darlene, Jeanette and Terry along with myself, have signed up for a number of virtual stamping events in the past 3 years.  One of the benefits of these events are that they are available to rewatch or even watch for the first time at a later date as they are all recorded. The 4 of us "try" to watch live and chat by texting during the event.  But, life steps in and there are times when one or more of us are not participating during the live.  Then, the kits from sponsors sits in our stamping area until we are ready to watch the video and create.  During one of the events, we decided we needed to push ourselves (and each other) to get some of these events done!   So--we all decided to devote one day a month, the last day of the month for the procrastinators that we are, to post cards we missed making.  So--here we are in our 7th month of The Catch Up Club!

Reminder--these are not my own designs!  The cards are the designs of the other instructors from these classes.  I am just recreating the cards from the class. This month the creations are from Sarah and The Paper Cut in Appleton, WIS!

These 4 cards are from a recent card class Sarah did for the Crafters Classroom called Glossy Resist. This technique is created by crinkling a piece of wax paper,  laying it over a piece of white glossy cardstock and then using an iron over the top. Sarah included extra panels of glossy cardstock in our kit and I laid that over the wax paper, so I had two panels to use--the top and the bottom one.  I had a small craft iron in my stash from many years ago that has never been used.  I think I purchased it to "iron" out the wrinkles from ribbon I had rolled over squares of foam board in my storage.  I guess the wrinkles do not bother me in the few times I use the ribbon as the cord of the iron still had the wire holding it together!  We then inked colors over the background panel to get the interesting look.  I used my TE ink cubes and they worked perfect. You do wipe the panel with a piece of paper towel to get off the excess ink.  I used 3 colors on the bison card.  We then completed our cards with the additional materials provided--no stamping needed as Sarah included everything else for the cards!


Sarah offers many different kinds of classes through the year and kits can be ordered from their website.  And, there is an in-person class in September where we can make a boat-load of cards.  That will also be a virtual option.


I hope you enjoyed my cards!  Here are the links to the other of the Catch Up Club.  Please be sure to check out Jeanette's, Terry's, and Darlene's blogs.  They may post today or tomorrow, but we have all promised to post cards that we have missed the making along the way!


Image/Sentiment:  Glossy Resist card kits from The Paper Cut--all of the dies and stamps used are from Impression Obsession

Cardstock:  All included in kit--all are available from The Paper Cut

Ink:  Taylored Expressions ink cubes in various colors

Accessories:  
All included in kit

Friday, July 28, 2023

Feeling Free


Today is the day I am posting my card for our Challenge Your Stash group on SCS.  This is our 79th month of de-stash, so we are in the middle of our 7th year of challenges.  I cannot believe my thought about using what we have is now 6+ years old!   I really like these challenges and know they will continue as I know I have many, many items in my stash that I can use and love the fun challenges!


The premise is to create a card or something else that uses only items that are in your own stamp room--nothing new is to be purchased.  The hostess each month posts their challenge to the group. Each person in the group creates their card with their own image, their own papers, their own embellishments with their own supplies--using up items from their own stash!  The card can be for any occasion and each person is encouraged to send the card on its way to someone so it can be admired.  It is a way for us to step out of the box a bit and create something that follows a challenge--isn't that what a challenge is supposed to be.  And--no money is spent as all items are to be already available in each of own stamping spaces.

Pansy posted our July challenge--Feeling Free!

I pondered what to think of Pansy's theme and I thought of things that fly--as they are free.  I knew I had a few Unity stamps that would work and I picked Let Your Wishes Fly.  I think the title of the stamp set is perfect for this challenge!  I also found a watercolored panel in my "stash" and thought the colors were fun for the dragonfly image.  I stamped the image on part of the panel I made and then die cut it with a Spellbinders Nestabilities circle die--plus a black backer.  I used my Sizzix Tim Holtz Lumber embossing folder for some texture on the background.  The sentiment is from the same Unity set and was die cut with an Altenew Nesting Label die. A few white enamel dots around the card is the final touch!


If you check some of the blogs on my sidebar, you may find others who have posted their cards in the next few days. There may be more posted in the thread on SCS, so you might want to check out the link here.  We also have a keyword for the SCS Gallery--it is CYSJUl.  You might see many cards there if you do a search.  They probably will be posted today or in the next few days.

I hope you enjoyed my card and I know I am excited to check out what my other hoarders, I mean stash reducers have made!  Thanks for stopping by today!  For August, Lorraine is up for our challenge.  Be sure to check back to see what we create then!


Image/Sentiment:  Unity Stamps Let Your Wishes Fly

Cardstock:  The Paper Cut Cougar Opaque 100# White; Stampin' Up Basic Black, Bermuda Bay; Watercolor Background

Ink:  Hero Arts Intense Black

Accessories:  Altenew Nesting Labels Die; Spellbinders Nestabilities Circle Dies; White Enamel Dots; Sizzix Tim Holtz Lumber Embossing Folder

Wednesday, July 26, 2023

Wet My Plants


This card was posted on Instagram last weekend for a hop called Rediscovery! The premise of this hop is to find the treasures hidden, instead of buying new supplies.  We all have those drawers, bins and shelves that have been tucked away and forgotten.  We all need to root through them and rediscover what we have!  The hop is always the last weekend of every month and we are able to pick if we want to post on Saturday or Sunday.  I picked yesterday to post my card, but I will also check out the great cards posted today too!

The theme for July is Summer.  I picked a fun stamp set from Art Impressions called His & Her Gardeners.  We are on an acre and a half, so we have lots of area to garden in the summer. We also have a greenhouse!  We are able to start seeds in our basement under lights in our basement and then move out to greenhouse.  I am "in charge" of the flowers in pots and baskets--and we have quite a few on the deck and other places.  We also have a vegetable garden inside a fence full of raised beds and various containers.   So-summer means gardens to us!


I colored the image with my Copic Sketch Markers.  I die cut from the Granny Apple Green panel with a Gina Marie Designs Peekaboo Oval Die and then embossed the panel with a Sizzix Tim Holtz Cobblestone 2 folder. I added foam tape under the oval panel and popped it over the image.  I also added the bee stamp and hose around the oval.  The sentiment is also in the stamp set and I did cut it with a Gina Marie Double Stitched Oval die. No additional embellishments are needed.


This hop on Instagram happens the last weekend of every month. If anyone is interested in joining us in the future, feel free to contact Tracy on IG--@craftwithme101    I know I will be back hopping in August!

Image/Sentiment:   Art Impressions HIs & Hers Gardeners

Cardstock/Patterned Paper:  The Paper Cut Cougar Opaque 110# White; Stampin' Up Granny Apple Green

Ink:  Hero Arts Intense Black;

Accessories:  Sizzix Tim Holtz Cobblestone 2 Embossing Folder; Copic Sketch Markers; Gina Marie Designs Peekaboo Oval Die, Double Stitched Circle Die

Saturday, July 22, 2023

Honey Bee


Here we are--this is the Double Duty Day!  This is the 31st month, so we are now in year #3


Each month, we get to pick a stamp set from a predetermined company. Then, we will use that one stamp set and make two cards from the set.  Different images and sentiments from the same set can be used, or use the same image two different ways—Double Duty either way!  But, as an added challenge, one item must be used on both cards—same color cardstock, same ribbon, same stencil, same something.  Double Duty Again!  We will post both cards on our blog on the the 22nd of each month.  See-Double Duty again!  We will be sure to have fun getting doubly inky each month with a different stamp company.  Let’s have fun!

For July, the company we showcasing is Honey Bee Stamps.  This is a very fun company and has some really cute sets to pick from.  I have a few of their bee stamps, so that is what I went with this month!  The stamp set I picked is called Bee Cool and I have the matching die set.  

For the first card, I used a Hero Arts Honeycomb die for the background.  I die cut the glasses frame and backer for the word bee from the same Crushed Curry as the back panel.   All of the die cuts are layered three times for some dimension on the card.  I added some yellow enamel dots around the card.


For the second card, I embossed the background with a Stampin' Up Hexagons Dynamics folder.  The bee's glasses and the word be was die cut with Black Mirricard from The Paper Cut.  Again, all of the die cuts were layered three times.    I added black glitter enamel dots around the card.


Both cards use the the same color combo--black, yellow and white.  The backgrounds on each are hexagons--honeycombs.  


I hope you enjoyed my cards for our group.  Please be sure to check out the other Double Duty cards. Here is a link to Jeanette'sDarlene’s  and  Carol's blogs.   I am sure you will not be disappointed and will see a couple of sets of great cards.  

Next month we are picking any company who is no longer in business--should be fun.  So be sure to check out our cards on August 22nd!  


Image/Sentiment:  Honey Bee Stamps Bee Cool Stamp and Die set

Cardstock/Patterned Paper:  The Paper Cut Cougar Opaque 100# White, Black Mirricard Metallic; Stampin' Up Crushed Curry,  Basic Black

Ink: Hero Arts Intense Black

Accessories:  Stampin' Up Hexagons Dynamic Embossing Folder; Hero Arts Honeycomb Die; Black Enamel Dots

Monday, July 17, 2023

Birthday Bash Foiled


This is a set of three cards that I posted on Instagram over the weekend for a hop called Create It 3 Ways! This hop is to showcase triple inspiration by creating 3 cards by choosing our own category to feature across all three cards.   The theme for July is birthday cards and I decided to do foiling.  I recently bought a Minc and replaced another laminator--and I love it!  It works every single time and only takes a few minutes to warm up, versus the half hour or more in the past.  I have a number of Foil Mates from Gina K Designs and decided to use those for the sentiments and the backgrounds--all foiled in red Deco Foil from Therm-o-web.  The backgrounds are from the Dots & Strings package and the sentiment are from the Birthday Bash set.


These cards all have the same Red Lacquer Metallic cardstock base, along with the black layers.  I used Gina Marie Designs Cross Stitched Circles and Rectangles to die cut the sentiments. 


I know I will be using many of the packages of Foil Mates that I have stored away as I now have a fun, new machine to use.  Be on the lookout for more foiled cards coming soon!!!!!!!

This hop on Instagram will happen every month on the third Saturday--see, another three!  If anyone is interested in joining up, contact Amrita on IG @amritapettus.  I know I will be back hopping in August!

Image/Sentiment:  Gina K Designs and Therm-o-web Foil Mates Birthday Bash-sentiments and Dots & Strings backgrounds.

Cardstock/Patterned Paper:  The Paper Cut Red Lacquer Metallic; Stampin' Up Basic Black, 

Ink:  None--Thermoweb Red Deco Foil

Accessories:  Spellbinders Dazzling Dots Embossing Folder, Circle Nestabilities Dies; Gina Marie Designs Cross Stitched Circle and Rectangle Dies; Black Ribbon; Gina K Designs Master Layouts 2; Black Enamel Dots

Saturday, July 15, 2023

Christmas in July


Today is the 15th and this is my card for our The Creative Crew!  We are a group of 7 and all one team--Jeanette, Carol, Darlene, Lorraine, Terry, Tracie and me. Each month will be a new challenge posed by one of the members sending out a kit.  This month Jeanette sent everyone a fun Christmas in July kit. She decided after two months of florals, it was time for something cooler!

Jeanette sent everyone this cute image from CC Designs called Green One.  She was so kind as to have some already die cut for us--yay!   She also included a variety of sentiments--one is on the front and the other on the inside of my card.   We also received some fun and very colorful patterned paper.  Of course, she also included some bling along with ribbons.  

I wanted to use a few of the colorful papers, so I layered two as my background for the image. I colored one of the die cut grinch images with my Copic Sketch Markers and added some Wink of Stella on the white fur.  I popped it up on the holly background.   I added a piece of the bright green ribbon to the panel.  The sentiment was die cut with a MFT banner die from the Blueprints 27 die set.  I added some bling to the banner and also around the background!  This was fun card to make!


This is the inside of my card with the second sentiment.  


I hope all of The Creative Crew Gals enjoy my card this month. Please be sure to stop in to see what fun crafty cards are posted this month.  All of the blogs can be found on my left sidebar.  Our teammate Lorraine does not have a blog, so please check out her card in her SCS gallery.   I am sure you will enjoy all of the wonderful creations this month!   

We will be back in August with the kit Lorraine will be sending out.  Be sure to check in with us on the 15th to see what fun she has planned!


Image/Sentiment:  CC Designs Green One image and sentiment; Crackerbox Grinch Saying on the inside

Cardstock/Patterned Paper:  Accent Opaque White;  Stampin' Up Granny Apple Green; Recollections Fa La La LA Paper-Mistletoe Patterned Paper; My Mind's Eye 12 Days of Christmas-Red Patterned Paper

Ink:  Memento Tuxedo Black

Accessories:  Copic Sketch Markers; Stampin' Up Green Ribbon; MFT-My Favorite Things Blueprints 27 die set; Red Rhinestones; Wink of Stella

Wednesday, July 12, 2023

Hot Mess Cards


Today is the the 12th and it is time for another Hot Mess card.   This is card number 50, so we are into year #5. The idea of Hot Mess ~ Success is to Get Messy and you will have Success!  Messiness can be almost anything that we come up with--glitter, alcohol inks, glimmer glitz, sponged backgrounds, etc., anything that is a bit messy.  We are a very fun group and will post a card each month on the 12th.  The links to the other members are on my left side bar and I will also link them at the bottom at this post.


For this month's messiness, I used some Simon Hurley Lunar Paste.  I picked some 3-D Embossing Folders and black cardstock.  I then used my fingers to add the colored paste to the embossed images.  I did also add a bit of Crocodile Tears Solar Paste over some of the colors on the panels.    

But, for the first card, I used the Solar Paste on a black panel with a Simon Hurley Stencil called Looks Like Rain.  The die is Simon Says Stamp Feel Better Soon, cut from Navy Mirricard.  The black panel was then die cut with Gina K Designs Master Layouts 2 and mounted on Misty Moonlight.  The card base is Night of Navy.


For the red/blue card, I used my Sizzix Woven 3-D Embossing Folders and black cardstock. The Lunar Paste colors are Midnight Snack and Game Over, applied with my fingers.  I added a bit of Crocodile Tears Solar Paste where the two colors met.  The die cut is from Erin Lee Creative, called Oh Happy and was cut three times from The Paper Cut's Burgundy Mirricard.  I added some navy enamel dots around the word!


For the Thanks card, I used my Sizzix Doily 3-D Embossing Folders and black cardstock. The Lunar Paste colors are Tropical Tango and Minty Fresh, again applied with my fingers.  I added a bit of Crocodile Tears Solar Paste over parts of the design.  The die cut is from Taylored Expressions called Framed Script Thanks and was cut three times from The Paper Cut's Green Mirrisparkle.  I added some green glitter enamel dots around the words!


For the final card, I used my Sizzix Tim Holtz Cobblestone 3-D Embossing Folders and black cardstock. The Lunar Paste colors are Midnight Snack, Minty Fresh and Tropical Tango, applied at an angle along the cardstock. I again added some Solar Paste sparingly around the panel.  The die cut is from The Paper Cut and is called Happy Birthday-- it was cut three times from TPC's Navy Mirricard.  I added some green enamel dots around the words!


Here are all 4 cards, using Simon Hurley's Lunar Paste and Solar Paste.


I really like the look of my cards and hope you do too.  I also sure hope my fellow messy ladies like them too!  Here are the links to the other somewhat messy crafters:   Carol, Darlene, Jeanette and Terry.   I am sure you will enjoy seeing how everyone got messy this month and was successful in making some great cards!   Be sure to check back to see what we are up to on August 12th.  

Image/Sentiment:  The Paper Cut Happy Birthday, Erin Lee Creative Oh Happy Day, Taylored Expressions Script Thanks and Simon Says Stamp Feel Better Soon Dies

Cardstock/Patterned Paper:  Stampin' Up Basic Black, Night of Navy, Misty Moonlight; The Paper Cut Burgundy, Navy and Green Mirricard, Green Mirrisparkle, 

Ink:  Simon Hurley Midnight Snack, Tropical Tango, Minty Fresh and Game Over Lunar Paste, Crocodile Tears Solar Paste

Accessories:   Sizzix Woven, Cobblestone 2 and Doily 3-D Embossing Folders; Simon Hurley Looks Like Rain Stencil;  Enamel Dots

Monday, July 10, 2023

Let's Go Fishing!


This is my July card for the monthly themed swap that Terry is hosting on SCS. Each month she will post a theme and we make cards using any stamp set we believe follows that thought. The theme for July is "Sparkling Water" 


The stamp set I picked for this month is a favorite Stampin' Up set for masculine cards called Best Catch.  I paired it with some of the new SU Designer Series Paper called Let's Go Fishing!  I stamped the image and sentiment in Pecan Pie so it has a bit of a vintage look.  I added some SU Braided Linen Trim and used my circle punches for the sentiment.  A few cream enamel dots 
were added for the final touch.


I hope Terry and the others swappers like my card this month too! Terry has posted all of the 2023 themes, so be sure to come back to see what we create!  

Image/Sentiment:  Stampin' Up Best Catch Stamp Set

Cardstock/Patterned Paper:  The Paper Cut Cougar Opaque 110# White; Stampin' Up Pecan Pie, Misty Moonlight, Boho Blue, Let's Go Fishing DSP

Ink:  Stampin' Up Pecan Pie

Accessories:  Stampin' Up Circle Punches, Braided Linen Trim; Ivory Enamel Dots

Sunday, July 9, 2023

Crafting is my Cardio!


Today is the 9th and it is now time for another The Three Musketeers post. We are ready to showcase the card we all created with the Newton's Nook image that I sent out for our July card, #107! That means we are coming to the end of year number 7 with this fun challenge! All three of us sure have enjoyed the challenges every month and we hope that it continues for a long time! 


I sent Kelly and Jeanette a couple of the Newton's Crafty Cardio images, some die cut and some on a full panel.  There are also a number of smaller items in the set that I also die cut--scissors, pencil, washi tape, etc.   I also included a couple of the fun sentiments from the same stamp set.  

I colored one die cut image with my Copic Sketch Markers. I also colored 4 of the small "embellishments".   I die cut an arch from a MFT Elegant Stitched Die out of Gray Granite.  I then popped up the image and add ons around the arch. The background is a very fun scissors pattern from the Carta Bella Craft & Create-Makers Plaid package.   I die cut the sentiment and the Gray Granite layer from The Paper Cut's Stitched Oval Dies.   I hope Jeanette and Kelly along with you enjoy my card!


Please check out the other Musketeer's cards.  Here is the link to Jeanette's blog along with Kelly's blog.  I am sure you will not be disappointed and will see a couple of great cards!  Jeanette is up for our August challenge--please be sure to join us again. 


Image/Sentiment:  Newton's Nook-Newton's Crafty Cardio Stamp Set

Cardstock/Patterned Paper:  The Paper Cut Cougar Opaque 100# White; Stampin' Up Gray Granite, Basic Black, Real Red; Carta Bella Craft & Create-Maker's Plaid

Ink: Hero Arts Intense Black  

Accessories:  Copic Sketch Markers; The Paper Cut Stitched Oval Dies; MFT-My Favorite Things Elegant Stitched Dies

Friday, July 7, 2023

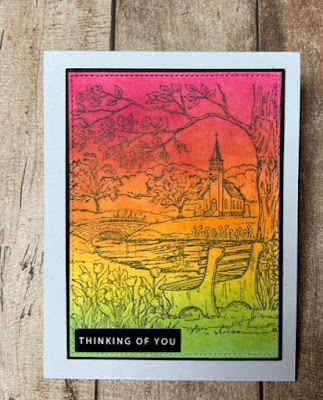
God is All Around


This is my July Crafters of Faith card.  This is a sweet group on SCS that Faye hosts.  And, Faye is also the hostess this month and gave everyone this challenge:


Scripture:  Deuteronomy 4:39 "Know therefore today, and take it to your heart, that the Lord, He is God in heaven above and on the earth below; there is no other."

Challenge:  Use this verse for a card or layout idea.

I thought about this scripture and went with an idea I had last month--a large background stamp and ink blending.  The stamp is from Northwoods Rubber Stamps and they do not have names on their wood mounted stamps.  I think I have had this stamp for a long time.  I really like their stamps, though I do struggle a bit getting good coverage as I am not using my Misti.  I would have liked to stamp this a few more times to get a darker image, but the light image actually looks good.  I ink blended the background using 4 Taylored Expressions inks for the colorful look.  I then stamped the image with Hero Arts Intense Black Ink.   The sentiment is from  Gina K Designs sentiment pack.  I die cut the colorful panel with Gina K's Master Layouts 2 and added a black layer to the cardstock base.  No embellishments needed on this card!


I hope you and the others from the Crafters of Faith group like my card this month! We are to post on the 7th of each month, so if you look on my sidebar, you may see other creations.  I know that there will be many posted in the COF thread on SCS too!  

Image/Sentiment:  Northwoods Rubber Stamps/Gina K Designs Sentiment Strip

Cardstock/Patterned Paper:  The Paper Cut 100# Cougar Opaque White; Stampin' Up Basic Black

Ink:  Hero Arts Intense Black; Taylored Expressions Dill Pickle, Mango, Candy Corn and Fruit Punch
 
Accessories:  Gina K Designs Master Layouts 2