Today is the final day of our Stamping Sisters Mini Summer Camp. I am wrapping up the 4 day camp and I sure hope you have enjoyed our classes. If you have missed any of the days, please go back and check out the three previous tuorials by our awesome camp counselors.
Here are our blogs and the days of being a camp counselor:
Monday/June 22 ~ Kelly @ Sandcastlestamper
Tuesday/June 23 ~ Darlene @ Accordingtobijou
Wednesday/June 24 ~ Jeanette @ Creativeplay
Thursday/June 25 ~ Barb (me!) @ inkingintoretirement
I am here for our final class and you will need the following items:
- A stencil-any design works.
- Pixie Spray and/or tape is recommended to hold your stencil in place.
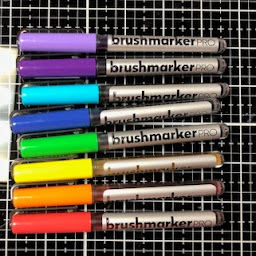
- Watercolor Markers--all four of us recently purchased a set of Karin Brushmarker Pro watercolor markers and I hope they use them today! I would like you to pick some bright rainbow colors for your card.
- An Aqua-painter or water-brush
- A word or image die
- Watercolor Paper
- Cardstock to complete your card
- Any embellishments you might want to add
First--I sprayed Pixie Spray on the back of my stencil and laid it over my piece of watercolor paper. Be sure to push down the middle of your stencil so it has good contact with your paper on all parts.
I picked two stencils from A Colorful Life Designs--Bare Rainbow and Heart Fade. I like the results of the rainbow die better as it has larger open spaces than the smaller hearts. The watercolor will seep under the stencil, so it is a bit less obvious in larger areas.
Now, pick out any number of watercolor markers. I went with bold colors for both cards and used the ROYGBIV order. There are 8 colors in my rainbow card as that is the number of rows.
I started in one corner of the stencil by adding color with my markers direct to the paper. I outlined the arches of the rainbow and then scribbled in between the outlines. Then, I used my Aqua-painter to move the color in the open area of the stencil. You can add more ink from your marker if you want a darker color.
I then trimmed the panels and layered with bold colors of cardstock. I then die cut words for each card. For the rainbow, I used Taylored Expressions Celebrate Script and Backer. On the hearts, I went with a new die I just received from Simon Says Stamp called Scripty Happy Birthday. I then added a few white glitter enamel dots to the rainbow.
I really like these two cards and I hope you do too!
I hope you will join me in making a card with some watercolor markers, a stencil and a sweet die. Since today is the final day of camp, we will say our goodbyes and see you soon. Who knows--maybe we will do this again in the fall and hope you will join us again!
It has been a great time--I so enjoyed making the other cards that my sweet counselors taught. I love the new techniques and the great cards as a result!
Image/Sentiment: Taylored Expressions Celebrate Script & Backer and Simon Says Stamp Scripty Happy Birthday Dies
Cardstock/Patterned Paper: Strathmore Watercolor Paper White; Stampin' Up Real Red, Brilliant Blue, Daffodil Delight, Tempting Turquoise, Mango Melody
Ink: Karin Brushmarker Pro Watercolor Markers
Accessories: White Glittery Enamel Dots; A Colorful Life Designs Stencils--Bare Rainbow and Heart Fade


4 comments:
Barb, your cards are gorgeous and your detailed tutorial is very helpful! YAY! An excuse to play with my Karin markers!
I love this tutorial!!! Your tutorial is detailed perfectly. Thank you!
Hmmm...I have so many stencils to choose from! Back in a bit with what I create.
Queen! I loved the class you taught with our fabulous Karin markers - though yall had a great advantage with many more colors, I was inspired by your rainbow - and had just enough! Thank you! Superb class today and I loved your step by step class - and your enthusiasm to create along with me in friend's camp! Inky hugs!
Great technique Barb, and fabulous results
Stay safe
Blessings
Maxine
Post a Comment