Tuesday, August 30, 2022

Kaleidoscope Rainbow

I have been going through a basket with many backgrounds that I have made classes or when I just make a few to keep on hand!  This one was made during a Taylored Expressions event and it is of course Rainbow!  

The background was die cut with a Taylored Expressions Kaleidoscope Cutting Plate.  I then was left with a stencil that was blended with Taylored Expressions inks.  I then picked a large sentiment die from Lawn Fawn called Giant Thank You!   The sentiment was die cut 3 times from white cardstock and layered for dimension.  I added some Stampin' Up Opal Rounds Enamel Dots for a bit of bling.  I think this is a cute card--another thank you card for my stash!  


Here is the inside of my card with a strip of rainbow washi tape:


I hope you like my card. 


Image/Sentiment:  Lawn Fawn Giant Thank You Die

Cardstock/Patterned Paper:  Recollections 100# White;  Stampin' Up Basic Black

Ink: 
 Taylored Expressions Ink Cubes

Accessories:  Stampin' Up Opal Rounds Enamel Dots; Taylored Expressions Kaleidoscope Cutting Plate

Sunday, August 28, 2022

Eat More Chicken


Today is the day I am posting my card for our Challenge Your Stash group on SCS.  This is our 68th month of de-stash, so we are in the middle our 6th year of challenges. I really like these challenges and know they will continue as I know I have many, many items in my stash that I can use and love the fun challenges!


The premise is to create a card or something else that uses only items that are in your own stamp room--nothing new is to be purchased.  The hostess each month posts their challenge to the group. Each person in the group creates their card with their own image, their own papers, their own embellishments with their own supplies--using up items from their own stash!  The card can be for any occasion and each person is encouraged to send the card on its way to someone so it can be admired.  It is a way for us to step out of the box a bit and create something that follows a challenge--isn't that what a challenge is supposed to be.  And--no money is spent as all items are to be already available in each of own stamping spaces.

Sharon posted our August challenge--use water on your card, either an image or watercolor or spritz, or the word water.

I love this Whipper Snapper Designs older wood mounted stamp called Eat More Chicken!  It just makes me smile.  We are also at a lake house in northern Wisconsin and have tried a bit of fishing.................... tried!  I colored the image with my Copic Sketch Markers.  The background papers are from the Bella Blvd. Secrets of the Sea line called Seashore--more water!  I added some Bermuda Bay Baker's Twine and some blue sequins for the added touch!


Here is the inside of my card with a strip of the patterned paper:


If you check some of the blogs on my sidebar, you may find others who have posted their cards in the next few days. There may be more posted in the thread on SCS, so you might want to check out the link here.  We also have a keyword for the SCS Gallery--it is CYSAUG.  You might see many cards there if you do a search.  They probably will be posted today or in the next few days.

I hope you enjoyed my card and I know I am excited to check out what my other hoarders, I mean stash reducers have made!  Thanks for stopping by today!  For September, Vickie is up for our challenge.  Be sure to check back to see what we create then!


Image/Sentiment:  Whipper Snapper Designs Eat More Chicken

Cardstock: The Paper Cut 100# Cougar Opaque White; Stampin' Up Bermuda Bay, Tangerine Tango, Night of Navy; Bella Blvd. Secrets of the Sea-Seashore Patterned Paper

Ink: 
 Hero Arts Intense Black

Accessories:  Copic Sketch Markers; Stampin' Up Bermuda Bay Baker's Twine; Blue Sequins

Friday, August 26, 2022

White on White Anniversary Card


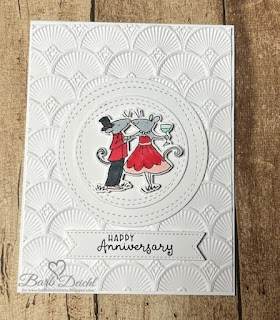
Today I am posting a card for a SCS Challenge by Misti Monday to use one of the mini stamps that many of us have.  I have a few of the sweet mini stamp sets from Colorado Craft Company--love them!  My friend Jeanette recently posted a card with layers and layers of white patterns, so I thought I would give that a try.  I do really like white on white cards!


I picked the Colorado Craft Company mini stamp set called Anniversary Mini.  I think this couple is so dang cute!  I colored the image with my Copic Sketch Markers and then used a coordinating die I have to cut it out.  The sentiment is from the same set and I die cut it with my Gina K Designs Master Layouts 2.  The background layer is a newer to me embossing folder from Sizzix called 3-D Art Deco.  I love the dimension is gives to the card.  I then die cut 2 circles from a MFT-My Favorite Things set called Wonky Stitched Circles.   A perfect anniversary card!


I hope you like my card.  Be sure to use those mini-stamps and try a multi-layered white on white card


Image/Sentiment:  Colorado Craft Company Anniversary Mini Stamp Set

Cardstock: The Paper Cut 100# Cougar Opaque White; 

Ink: 
 Hero Arts Intense Black

Accessories:  Copic Sketch Markers; Sizzix 3-D Art Deco Embossing Folder; MFT-My Favorite Things Wonky Stitched Circles; Gina K Designs Master Layouts 2

Wednesday, August 24, 2022

We Wish You a Merry Christmas


You will be wishing everyone a Very Merry Christmas Eve 4 months from today!  Have you started shopping?

Today I am posting a card that I made for our challenge group on SCS called Christmas Crazy!  Shelly is the coordinator of the group and she also sent everyone in the group this kit that included the sweet image, sentiment and some patterned paper for July and August!  For the rest of the months, she pairs us up and we send each other a similar kit.  But, she sent them all this round--thanks my friend!

Shelly sent us the image and sentiment from Dreamland Crafts stamp set called We Wish You a Merry Christmas.  I colored the image with my Copic Sketch Markers.  The sentiment was die cut it with my Taylored Expressions Modern Sentiment Labels. I then layered the Christmas plaid patterned paper over the Garden Green and Cherry Cobbler and used three sizes of Spellbinder circle dies for the layers.  At that point, I decided to make a shaker card!  I put a piece of acetate behind the three layers and then added Taylored Expressions Bold Tiny Diamonds in green, red and white.   I now have a fun Christmas Card!


Here is my card shook up to see the Tiny Diamonds!


I hope you like my card.  And--thanks Shelly for a fun kit this month!


Image/Sentiment:  Dreamerland Crafts We Wish You a Merry Christmas Stamp Set

Cardstock/Patterned Paper:  Recollections 100# White;  Stampin' Up Garden Green; Cherry Cobbler

Ink: 
 Gina K Designs Black Onyx

Accessories:  Copic Sketch Markers; Spellbinders Nestabilities Circle Dies; Taylored Expressions Modern Sentiment Labels, Tiny Diamonds-Bold; 

Monday, August 22, 2022

Penny Black Vase


Here we are--this is the Double Duty Day!  This is the 18th month, so we are in the middle year #2.  This was a thought that I had in the middle of the night and it is called Double Duty! 


Each month, we get to pick a stamp set from a predetermined company. Then, we will use that one stamp set and make two cards from the set.  Different images and sentiments from the same set can be used, or use the same image two different ways—Double Duty either way!  But, as an added challenge, one item must be used on both cards—same color cardstock, same ribbon, same stencil, same something.  Double Duty Again!  We will post both cards on our blog on the the 22nd of each month.  See-Double Duty again!  We will be sure to have fun getting doubly inky each month with a different stamp company.  Let’s have fun!

For August, the company we are using is Penny Black.  There are many cute Penny Black images but I went with a favorite floral wooden stamp.  This stamp is called Polka Dot Vase Bouquet!


For both cards, I used the same embossing folder from Sizzix called Staggered Chevrons.  I also die cut the image panel on both cards with Gina K Designs Master Layouts 9.  The sentiment on both cards is also from a Gina K Designs card kit.   


For this card, I stamped the image and colored with my Copic Sketch Markers.  I added some Trinity Stamps Pink bling as the final touch.


For the second card, the yellow one, I stamped the image on watercolor cardstock.  I used my Altenew Watercolors pens to color the image.  I added some Pinkfresh Studio Peach Fuzz Jewels as the final touch!  


So again, I had a number of Double Duty elements on these cards. I used the same embossing folder on both cards.  I die both image panels with Master Layouts 9 and used the same sentiment strip, all from Gina K Designs.  I also used only two colors of cardstock for each card--and typically I used three!  Gems were the final touch on both!


I hope you enjoyed my cards for our group.  Please be sure to check out the other Double Duty cards.  

Here is a link to Jeanette's,  Darlene and Carol's blogs. I am sure you will not be disappointed and will see a couple of sets of great cards.  Our friend Kelly might occasionally post a card for our challenge, but she could not commit to the entire year.  So, check her blog to see if she did play along this month!

Impression Obsession Stamps is up for our our September challenge, so be sure to check out our cards on the 22nd!


Image/Sentiment:  Penny Black Polka Dot Vase Bouquet Stamp/Gina K Designs Sentiment strip

Cardstock/Patterned Paper:  The Paper Cut Cougar Opaque 110# White and Watercolor Cardstock;  Stampin' Up Daffodil Delight, Granny Apple Green, Blackberry Bliss, Flirty Flamingo

Ink:  Hero Arts Intense Black

Accessories:  Copic Sketch Markers, Altenew Watercolor Pens; Sizzix Staggered Chevrons Embossing Folder;  Gina K Designs Master Layouts 9; Trinity Stamps Pink Bling; Pinkfresh Studios Peach Fuzz Jewels

Saturday, August 20, 2022

Faux Stair-step


Today I am posting a card for a SCS Challenge by Misti Monday to use one of the mini stamps that many of us have.  I have a few of the sweet mini stamp sets from Colorado Craft Company--love them!  I also made a new-to-me fun fold that my awesome demo Sarah made a few weeks ago on one of her Facebook Lives called Coffee Klatch.  It is a faux stair step card and is very easy to do.


I picked the Colorado Craft Company mini stamp set called Ice Cream Day.  I think it is so dang cute!  I colored the image with my Copic Sketch Markers.  The sweet sentiment is from the same set and I die cut it with my Taylored Expressions Double Ended Flag Stacklets.  The background papers are from Illustrated Faith and Bella Blvd--Delight in the Day--Sprinkled With Bliss!  So cute and colorful! 


Here is a picture from the side so you can see how it stands and looks like a stair-step card.


Here is the inside of my card with a strip of the patterned paper:


I hope you like my card.  Be sure to use those mini-stamps and try a faux stair-step card!


Image/Sentiment:  Colorado Craft Company Ice Cream Day Mini Stamp Set

Cardstock: The Paper Cut 100# Cougar Opaque White; Stampin' Up Daffodil Delight, Melon Mambo; Bella Blvd-Illustrated Faith Delight in the Day-Sprinkled   with Bliss Patterned Paper

Ink: 
 Hero Arts Intense Black

Accessories:  Copic Sketch Markers; Taylored Expressions Double Ended Flag Stacklets

Thursday, August 18, 2022

Let's Ketchup Soon!


This is my card for a newer swap called the SIS--Surprise Image Swap.   This is card #4 and it is the same premise as before with the UIS or mystery image swap. The group will be a bi-monthly swap where we all use the same image, sent to us by the hostess.  The surprise part is that we are to not discuss the image at all until the day they are to be posted--the 18th of every other month.   The image for this round was provided by Carol.  She will swap the cards and include the new image for round #5 that Laura Jean stamps in everyone's return envie. Then--we do it all again in October!

Carol sent everyone two images and a number of sentiments from a stamp set from Hampton Arts/Tracey Hey.  I colored the sweet dachshund image with my Copic Sketch Markers.  I did cut the image and the black frame, along with the sentiment with my Gina K Designs Master Layouts 2.  The patterned papers in the background are from Basic Grey called Max and Whiskers-Goldie. I have had these papers forever as I loved all lines of Basic Grey when I first started stamping.   I added some brown jewels from The Ton as the final touch.  


Here is the inside of my cards with a strip of the patterned paper:


If you check some of the other blogs listed on my sidebars, you may find some other swappers who have posted their creations.  The due date is today, the 18th, or they may post in the upcoming days. You can also check out SCS and use the keyword SIS04 to see some posted there.  I hope everyone in the swap likes my card--and that you do too!


Image/Sentiment:  Hampton Arts Stamps/Tracey Hey dog stamp set
 
Cardstock/Patterned Paper:  White; Stampin' Up Early Espresso, Mango Melody, Basic Black; Basic Grey Max & Whiskers--Goldie Patterned Paper

 
Ink: Black

Accessories:  Gina K Designs Master Layouts 2; Copic Sketch Markers; The Ton brown jewels

Monday, August 15, 2022

Do Something Creative


Today is the 15th and that means the Dueling Darlings are back to post their fun cards!  This group was founded 10 years ago and there are a few of us that are the original members.  Kelly and Jeanette are still our team leaders and they try so hard to keep us all in line and going strong!  On team Kelly are Terry, Carol and me.  Team Jeanette consists of Lorraine, Darlene and Tracie.  And, we are all Dueling Darlings!  


This month the kits were sent by Lorraine and me!  The theme is Crafting!  Yes, something each and every one of the members in the group LOVE!  All different types are crafting are enjoyed by our group--stamping, journaling, scrapbooking, sewing and quilting to name a few.  I sent out a kit with fun images from Taylored Expressions Do Something Creative Stamp and Die Set.  I stamped and die cut some of the images as well as many of the sentiments in the set.  There are many options for my team to choose from!  I also sent some crafty patterned paper from the Carta Bella Craft & Create line.  I included some ribbons and fun embellishments--more choices.............................

I colored the images I picked with my Copic Sketch Markers.  I decided to use a MFT Blueprints 27 die that makes a frame with 3 squares and a long rectangle. I used my Gina K Designs Master Layouts 2 to die cut one of the patterned papers along with a gray backer. I layered the yellow frame over the scissors crafty paper and used foam tape for some depth.  I then added some of the fun craft images in the stitched frame and a few on the frame too.  I punched out one of the sentiments and a backer from some older Stampin' Up punches.  The final touch was adding some clear enamel dots around some of the images.  This was fun card to make!


Here is the inside of my card, with the patterned paper and another one of the sentiments:


I hope all of the Dueling Darlings enjoy my card this month and our crafty theme!  Please be sure to stop in to see what fun crafty cards are posted,    All of the blogs can be found on my left sidebar.  Our teammate and my partner Lorraine does not have a blogs, so please check out her card in her SCS gallery.   I am sure you will enjoy all of the wonderful creations this month!   September has Terry and Darlene up as hostesses, so be sure to check back on the 15th to see all of our creations.


Image/Sentiment: Taylored Expressions Do Something Creative Stamps and Dies

Cardstock/Patterned Paper:  The Paper Cut Cougar Opaque 100# White;  Stampin' Up Daffodil Delight, Basic Gray, Pear Pizazz; Carta Bella Craft & Create-Crafting & Happy Patterned Paper

Ink:   Memento Tuxedo Black

Accessories:  Copic Sketch Markers; MFT-My Favorite Things BLueprints 27; Stampin' Up Punches; Gina K Master Layouts 2; Taylored Expressions Clear Drip Drops

Saturday, August 13, 2022

Rainbow Paint Sticks!


This colorful card is for a fun challenge that Jeanette came up with two years called Mission Possible!  Jeanette sent us a mystery item three times in 2020 and asked if we would accept the challenge to make a project with the items even before opening the package!  Of course, Kelly and I said yes, so the challenge is on.  In 2021, we each took turns sending an item to each other.  We are back in 2022 with this challenge and will make a project three times this year with a different item each round!  This Will be Mission Impossible Possible!


For the second challenge in 2022, Kelly sent something for us to use along with the following info: Good Day, Ms. Card-Maker.  Your next mission, should you decide to accept it, involves the use of these rainbow tempera paint sticks.  As in the past, you will be working alongside the same two team members. This message will not self-destruct in five seconds, since I have no ability to do that and besides, you might need to refer to it again at some point.  Good Day and Good Luck!  She also noted that we have been selected to go beyond the call of the M-I-P duty and stretch our creative artistry boundaries.  We were given a full set of tempera paint sticks--art in a box!  There are so many ways to use these and Kelly has no doubt that we will be ready, willing and able to complete the (colorful) mission!

Kelly did send us an entire box full of rainbow colors.  They are from Art Unwrapped and are called Tempera Paint Sticks.   WOWZA--Thanks Loads Kelly!    So--when I see rainbow colors, I decided to use them to make a rainbow background.  I love the bold, bright colors!  I rubbed each of 7 colors of the rainbow paint sticks at an angle over a quarter sheet of cardstock.  I did go back a few times to fill in some white spots and try to blend them a bit--but they do not blend like inks.  I then die cut 3 panels from my Momenta Imperial Trellis Cover plate die in white and layered them together for some fun dimension.  The card base is white, so the panel is adhered directly to the base.  My sentiment is from Simon Says Stamp and CZ Designs called Chunky Hello.  I also die cut the word three times from white and layered on the black shadow for some sweet contrast.  I added 7 Gina K Designs pearls of each color of the rainbow over each of the coordinating stripes.  I like that added touch!


I think I met the challenge--mission accomplished!  I think these sticks are very easy to use and I am sure I will use them again--thanks for the fun gift and challenge Kelly!  I love the Bright Colors!  We will be back later this year with another fun challenge with an item that Jeanette will send to use--stay tuned!  

Please be sure to check out the other Mission Possible projects with these fun and colorful Tempera Paint sticks.  Here is a link to Jeanette's and Kelly's blog.  I am sure you will not be disappointed and will see a couple of great cards! I hope Kelly and Jeanette like my card.  


Image/Sentiment:  Simon Says Stamp CZ Designs Chunky Hello

Cardstock/Patterned Paper: The Paper Cut Cougar Opaque 110# White; Stampin' Up Basic Black

Ink:  Art Unwrapped Tempera Paint Sticks

Accessories:  
Gina K Designs Pearl Mix Rainbow; Momenta Imperial Trellis Cover Plate

Friday, August 12, 2022

Hot Mess Thank You Cards


Today is the the 12th and it is time for another Hot Mess card.  This is card number 39, so we are into year #4. The idea of Hot Mess ~ Success started with Kelly and the general theme is to Get Messy and you will have Success!  Messiness can be almost anything that we come up with--glitter, alcohol inks, glimmer glitz, sponged backgrounds, etc., anything that is a bit messy.  We are a group of 6 and we will post a card each month on the 12th.  The links to the other 5 members are on my left side bar and I will also link them at the bottom at this post.


For this month's messiness I made two thank you cards. I used some of the fun Creative Expressions Opal Polishes that Darlene got me hooked on a bit ago when she sent me two jars.  I think I now have close to a dozen colors and different types!!!  This month I took the polishes and rubbed them over a panel I had embossed with Stampin' Up's Tin Tile Folder.  For the Lawn Fawn Giant Thank You I started with a piece of black cardstock and used Copper Pearl Opal Polish.  For the Green Gina Marie Thank You, I picked Blue Parakeet and it sure looks very green!  I die cut both panels with my Gina K Designs Master Layouts 2 and added a layer behind each panel.  Each of the sentiments die cut from glossy cardstock and are layered three times for more dimension.  I added black pearls or iriscedent bling  to each of the cards--along with some green baker's twine to the green/white one. 


I really like the look of both of cards and hope you do too.  I also sure hope my fellow messy ladies liked them too!  


Here are the links to the other members of Hot Mess ~ Success.  Please be sure to check out Jeanette's, Terry'sKelly's , Carol's and Darlene's blogs. I am sure you will enjoy seeing how everyone got messy and was successful in making some great cards!   Be sure to check back to see what we are up to on September 12th.  

Image/Sentiment:  Lawn Fawn Giant Thank You and Gina Marie Thank You Dies

Cardstock/Patterned Paper:  The Paper Cut 100# Cougar Opaque White, Cocktail and Black Glossy; Stampin' Up Early Espresso, 

Ink:  None

Accessories:  Gina K Designs Master Layouts 2; Creative Expressions Opal Polish Blue Parakeet and Copper Pearl; Stampin' Up Tin Tile Dynamic Embossing Folder; Iriscedent Bling; Black Pearls; Green Baker's Twine

Thursday, August 11, 2022

Infinity Shaker


I have seen many versions of infinity shaker cards--or edge to edge shakers.  And, I am sure there are many other names for these.  So--I played along and made a fun birthday card with a full front shaker!

First, I picked some fun birthday patterned paper that I have had for a very long time.  The name of the company is Stemma and I have never even heard of them.  I think I got a pack of these years ago at Tuesday Morning and there are maybe 20 identical sheets in the pack--time to use some!  I cut the panel just a bit smaller than an A2 card and then attached it to the same size white panel to give it some stability.  I then layered that front panel on the Melon Mambo card base. I then took a piece of plastic like the kind of packaging around stamps and dies--yes, I have a few..................  I cut the clear panel about a 1/2 inch larger than the patterned paper.  I placed score-tape on all 4 sides of the back of the birthday panel and took the backing off of three sides. I then attached the clear panel on the front and wrapped the edges around the back to be secured with the tape.  I the added my shaker bits between the clear plastic and patterned paper.  I used some Taylored Expressions Tiny Diamonds in pinks, yellows and teals-to match the birthday themed paper.  I then sealed the final side.  I die cut the Cheers die from MFT three times and stacked the layers. I glued it to the outside of the clear panel.  I think this is such a fun and colorful card that will be perfect for any birthday celebration!


I hope you like my card.

Image/Sentiment:  MFT-My Favorite Things Cheers Die 

Cardstock/Patterned Paper:  The Paper Cut 100# Cougar Opaque White; Stampin' Up Melon Mambo; Stemma birthday themed patterned paper

Ink:  None

Accessories:  Taylored Expressions Tiny Diamonds; Clear Packaging for the front