Showing posts with label Pretty Pink Posh. Show all posts

Friday, June 12, 2026

Celebrate


Today is the 12th and it is time for another Hot Mess card.   This card is #82, so we are into year #8. The idea of Hot Mess ~ Success is to Get Messy and you will have Success!  Messiness can be almost anything that we come up with--glitter, alcohol inks, glimmer glitz, sponged backgrounds, etc., anything that is a bit messy.  We are a very fun group and will post a card each month on the 12th.  The links to the other members are on my left side bar and I will also link them at the bottom at this post.


For my messiness this month, I used some Creative Expressions Pastes--Summer Sky Poal Polish and Frosty Sparkle Kiss Glitter Kiss. I used a Simon Says Stamp stencil called Confetti. I made another panel with white cardstock and used both of the colors of paste.  I then picked a Toffee panel and had some of the Frosty Sparkle still on the stencil and added more of the Summer Sky, so it is a combination of both colors.  I then picked a fun die set from Pretty Pink Posh called Celebrate and Shadow.   I die cut the word Celebrate from Gumball as I thought it matched the sparkly confetti and also used that as a layer behind the Toffee cardstock. The backer was cut from Blueberry and this is also the card base.  The added sentiment is from my stash.  No Bling was added to the card.


I really like this sparkly card and hope you do too.  I also sure hope my fellow messy ladies like them too!  Here are the links to the other somewhat messy crafters: Darlene, Jeanette and Terry.I am sure you will enjoy seeing how everyone got messy this month and was successful in making some great cards!   Be sure to check back to see what we are up in July!


Image/Sentiment: Pretty Pink Posh Celebrate and Backer Die Set; Sentiment from stash

Cardstock/Patterned Paper:  The Paper Cut 100# Cougar Opaque White; Taylored Expressions Toffee, Gumball and Toffee

Ink:  None

Accessories:  Simon Says Stamp Confetti Stencil; Creative Expressions Summer Sky Opal Polish and Frosty Sparkly Kiss Glitter Kiss


Thursday, April 30, 2026

SCT and Pretty Pink Posh


Today is the last day of April and I am posting a set of cards for our challenge-The Catch-up Club!   A few of my stamping friends, Darlene, Jeanette and Terry along with myself, have signed up for a number of virtual stamping events in the past 4+ years.  One of the benefits of these events are that they are available to rewatch or even watch for the first time at a later date as they are all recorded. The 4 of us "try" to watch live and chat by texting during the event.  But, life steps in and there are times when one or more of us are not participating during the live.  Then, the kits from sponsors sits in our stamping area until we are ready to watch the video and create.  During one of the events, we decided we needed to push ourselves (and each other) to get some of these events done!   So--we all decided to devote one day a month, the last day of the month for the somewhat procrastinators that we are, to post cards we missed making. 

 So--here we are in our 35th month of The Catch Up Club!

Reminder--these are not my own designs!  The cards are the designs of the other instructors from these classes.  I am just recreating the cards from the class. This month the creations are from the March Scrapbook & Cards Today event called Crop & Create Delivered.  I was not able to watch any of the classes live and I am now starting on my pouches.  This is from the first class, taught by Mindy Eggen for Pretty Pink Posh.  

The card on the left has a stencil background with the large Cupcake Die.  The card on the right is a shaker card with the same die set and a stamped background.  Both cards have a some fun clay sprinkles called It's A Party. I have one more card from Mindy's class and then it is on to Laura Graf with Scrapbook.com!


I have a all of the classes from this spring Crop & Create to complete, 11 more companies!  Plus a few more virtual classes from The Paper Cut that need to be completed.   And, I know I have quite a few Pinkfresh Studio Create & Connect events from the past 3+ years to finish.  There are many pouches on my shelf that need attention! BUT--I am sure trying to Catch Up!

I hope you enjoyed my cards!  Here are the links to the other of the Catch Up Club.  Please be sure to check out Jeanette's, Terry's, and Darlene's blogs.  They may post tomorrow or in the next few days but we have all promised to post cards that we have missed the making along the way!  Come back in May to see what else I am behind on!


Image/Sentiment:  Pretty Pink Posh Birthday Sweets Stamp and Die Set, Cupcake Shaker Die; Small Celebrate Shadow Dies; Layered Birthday Sweets Stencils

Cardstock:  SCT White, Acetate, Vellum; Taylored Expressions Cupcake

Ink:  Various Taylored Expressions Inks

Accessories:
  Pretty Pink Posh It's a Party Clay Mix; White Glitter

Wednesday, July 2, 2025

Summer Fun


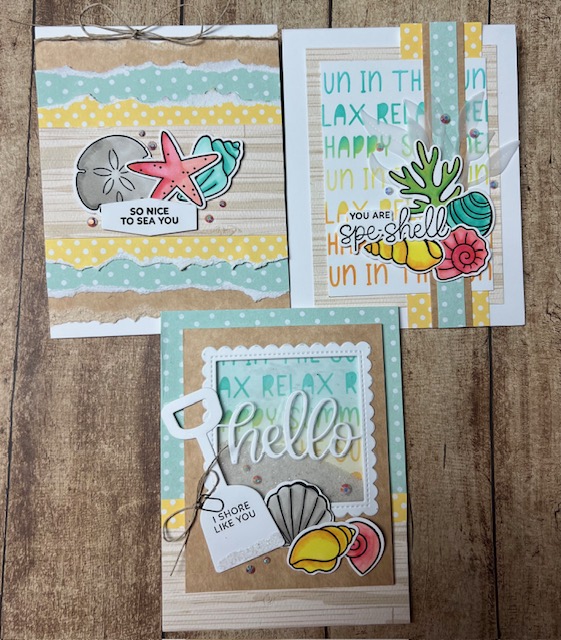
These cards are from a very recent virtual event sponsored by Firefly Farm called S'Mores Edition of the Creative Crates. These 3 cards are from the Pretty Pink Posh class taught by Mindy Eggen.  

Reminder--these are not my own designs!  The cards are the designs of the other instructors from these classes.  I am just recreating the cards from the class. 

This class used a newer bundle from Pretty Pink Posh and it screamed SUMMER!  The stamp set and matching dies we used is Seashells and the stencil is called Summer Words!   We also received all components to make these 3 cards.  We did some ink blending and Copic Coloring. We also made a shaker card with sand--so fun!


I have one more classes to go--hoping to do it today.

Image/Sentiment:  Pretty Pink Posh Seashells Stamp Set and Matching Dies; Summer Words Stencil

Cardstock/Patterned Paper:  All provided in the kit 

Ink:  Pinkfresh Studio Ink Cubes Various Colors;  Hero Arts Intense Black

Accessories:  Copic Sketch Markers; Sand; Twine; Bling

Sunday, September 5, 2021

Thank You For Being Kind!


This is my card for our September swap for my local stamp store called Polka Dots.  The theme is Monochromatic!  I picked a newer stamp that I am not sure I have used yet from Pretty Pink Posh called Simple Sayings-Kind. I then cut out the sentiment and the layer from my My Favorite Things-MFT Stitched Corner Tag Rectangles.  The background paper is from Stampin' Up's Tranquil Textures Designer Series Paper Pack. I added a strip of Tranquil Tide Mini Ruffled Ribbon under the die cuts and some greenish enamel dots to complete the monochromatic look!


Here is the inside of my card:


I am sure I will get back some sweet cards!


Image/Sentiment:  Pretty Pink Posh Simple Sayings-Kind

Cardstock:  The Paper Cut Cougar Opaque 110# White ; Stampin' Up Tranquil Tide, Soft Sea Foam, Mint Macaron, Tranquil Textures Designer Series Paper

Ink:  Stampin' Up Tranquil Tide

Accessories:  My Favorite Things-MFT Stitched Corner Tag Rectangles; Stampin' Up Tranquil Tide Mini Ruffled Ribbon; Enamel Dots


Sunday, March 14, 2021

Mission Possible


This is the 5th card of a new challenge started in 2020 with the three collaborators you have seen many times in the past--Kelly, Jeanette and me!  This is our 6th challenge amongst us!  Jeanette came up with this new challenge called Mission Possible!  Jeanette sent us a mystery item three times in 2020 and asked if we would accept the challenge to make a project with the items even before opening the package!  Of course, Kelly and I said yes, so the challenge is on.  We plan to do this quarterly and the item will change each round!  This Will be Mission Impossible Possible!

This is what Kelly sent to use this round: Good Day, Ms. Card-Maker. You did an outstanding job with your last mission and are to be commended!
Your next mission, should you decide to accept it, involves the use of the stencil in this package.  You may use stamps or other supplies from your stash with it, just make sure the stencil is the focal point of your card.  
 This message will not self-destruct in five seconds, since I have no ability to do that and besides, you might need to refer to it again at some point.

Kelly sent us a sweet stencil by Pretty Pink Posh called Birthday Background.  It is a large stencil, 6x6!  I love this stencil and I wanted to try something new when using it.  I went with Brutus Monroe Velveteen Glaze, the colors were Blueberry Bushel, Happy Heather and Banana Split.  l put the three colors on the stencil at an angle and let it dry overnight.  It is really thick and such fun colors.  However, I did not like the look of the entire stencil, so I decided to use a die to cut out a image to showcase.  I used my Gina K Master Layouts 4 to cut a heart and the black background.  I used an Embossing Folder from Lifestyle Crafts called Happy Birthday for the background. I picked the die cut Hugs and layered it three times from Astro King Snow White Metallic.  I added some white enamel dots to highlight the white from the stencil  I think met the challenge--mission accomplished! And, I am excited to do this again! We are going to continue in the next quarter and I have the item ready to send out!


Here is the inside of my card, with a strip of the stenciled background:


Please be sure to check out the other Mission Possible projects with this fun stencil.  Here is a link to Jeanette's and Kelly's blog.  I am sure you will not be disappointed and will see a couple of great cards! I hope Kelly and Jeanette like my card. Be sure to check back to see what else create this year. As I mentioned before, I am up next, so the Mission Impossible Possible Continues!

Image/Sentiment:  Pretty Pink Posh Birthday Background Stencil/Hugs Die 

Cardstock/Patterned Paper:  Stampin' Up Basic Black, Pacific Point; The Paper Cut Cougar Opaque 110# White; Astro King Snow White Metallic 

Ink: Brutus Monroe Velveteen Glaze-Blueberry Bushel, Banana Split, Happy Heather

Accessories:  Gina K Designs Master Layouts 4l White Enamel Dots; Lifestyle Crafts Happy Birthday Embossing Folder; 


Wednesday, August 12, 2020

Messiness Grows!


Today is time for another Hot Mess card and this is card number 13. We are now starting year two and we have added 2 new messy ladies to our group--Carol and Darlene!  The idea of Hot Mess ~ Success started with Kelly and the general theme is to Get Messy and you will have Success!  Messiness can be almost anything that we come up with--glitter, alcohol inks, glimmer glitz, sponged backgrounds, etc., anything that is a bit messy.  We are now a group of 6 and we will post a card each month on the 12th.  The links to the other 5 members are on my left side bar and I will also link them at the bottom at this post.


For this month's messiness,  I used some of my Tim Holtz alcohol inks and a bottle of alcohol pearl ink.  I dropped the colors on Yupo paper and used some blending solution along with an air blower to move the colors around.  I then dropped some pearl on the top and moved it around just a bit.   The die sentiment is MFT-My Favorite Things and edge is from Pretty Pink Posh called Scallop Borders.  They were cut from Silver Metallic and the words were layered three times. A few silver sequins are the final touch!


Here is the inside of my card, with a thin strip trimmed from the front:


Here are the links to the other members of Hot Mess ~ Success.  Please be sure to check out Jeanette's, Terry'sKelly's , Carol's and Darlene's blogs.  And, welcome Carol and Darlene to our group!   I am sure you will enjoy seeing how everyone got messy and was successful in making some great cards!   We will all be back each month, so be sure to check back to see what we are up to on September 12th.  

Image/Sentiment:  My Favorite Things-MFT Thank You Die

Cardstock/Patterned Paper:  Yupo; Stampin' Up Pacific Point, Granny Apple Green; Bindakote Silver Glossy Metallic

Ink:  Tim Holtz Alcohol Inks and Pearl Ink

Accessories:  Pretty Pink Posh Scallop Border; Silver Sequins


Friday, February 15, 2019

Friday's With The Project Bin


It is Friday, so  that means that I am back with another card for The Project Bin Stamps--A Way With Words!  Every Friday,  I post a card made from one of their great photopolymer stamp sets.  So, please plan to come back each week to see what I have created--I think you too will love these great sentiment stamp sets.  And, remember, some of the sets come with matching steel dies! Denise is the owner, founder and creator of these wonderful stamp sets.  The sentiments she has for us to ink up are just perfect for any holiday or time of year.  Please be sure to go and check them out! 

I am so excited to see what great stamp sets Denise has in mind for the future.  I am sure she will have some wonderful sentiments for us to ink up and for you to consider purchasing!  I just know you too will love creating cards with these stamp sets!!!  


If you want to check out more creations from the design team, be sure to check out The Project Bin Blog as often as you can.  Every day there is a different card posted by one of more of the design team members.  

For this card, I used the newest stamp set called The Gratest!  This set comes with 17 great images and sentiments.  There are some cute and very funny puns in this set!  This is a wonderful set to tell those you care about what they mean to you!  And, a great set to use for the day after Valentine's Day!  

I added some Wink of Stella to the Heart, so there is some shimmer and shine in real life, but hard to see here.


Here is the The Gratest stamp set:


Here is the inside of my card:


I hope you have enjoyed my card for The Project Bin. Check back on every week, any day for inspiration for the team but especially on Friday's to check out my cards. I am so excited to be on this wonderful design team!

Image/Sentiment: The Project Bin The Gratest Stamp Set

Cardstock/Patterned Paper: Recollections 110# White Cardstock; Stampin' Up Basic Real Red, Crumb Cake, Dapper Denim

Ink:  Memento Tuxedo Black

Accessories: Cuttlebug Polka Dots and Quickutz Beaded Embossing Folders; Copic Markers; Pretty Pink Posh Scallop Borders; Red and Blue Enamel Dots; Wink of Stella